Since the Ambrosinus-Toolkit v1.1.9 has been implemented with a new feature: Run Stable Diffusion locally thanks AUTOMATIC1111 (A11) project and ControlNET (CN) extensions. It is another AI tool that brings artificial intelligence power inside the Grasshopper platform.
AI as most people already know represents, again, the new paradigm shift in our Digital Era.
Recently one of my goals has been to share and elaborate computational solutions, more or fewer experiments, in order to offer anyone the possibility to explore their own projects through some tools based on artificial intelligence. Surely one of the starting points was the possibility of using the APIs shared by OpenAI, StabilityAI and the services offered by numerous platforms such as Hugginface (just to name one of the most active and famous). Many of these projects are migrating from a cloud execution (which certainly has its advantages especially hardware see Google’s Colab) to a local type, clearly, the hardware you have can make a difference. However, further processing based on different technologies such as DPT, latent space etc. is making it possible to run neural models on your machines (even in the case of low VRAM availability, anyway lots of forum discussions recommend at least 6 GB of VRAM – in my case I have 4GB).
Having established this, two particularly valuable projects in this sense and which in my opinion will make a big difference in the coming months and more generally in the development of web-based applications are Automatic1111 (well-known to nerd and geeky users 😉 ) and InvokeAI (a curious one is the ComfyUI project that adds a “node” system UI in VPL style).
Both take advantage of a web-based UI and offer numerous features to generate images through AI.
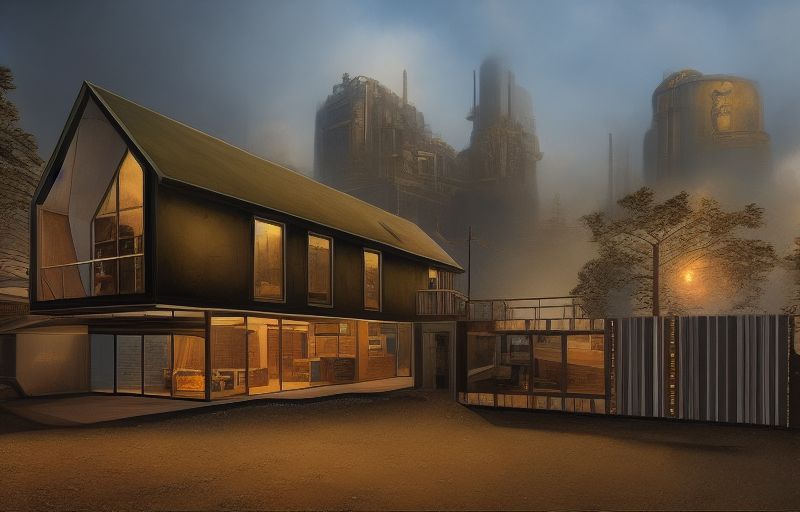
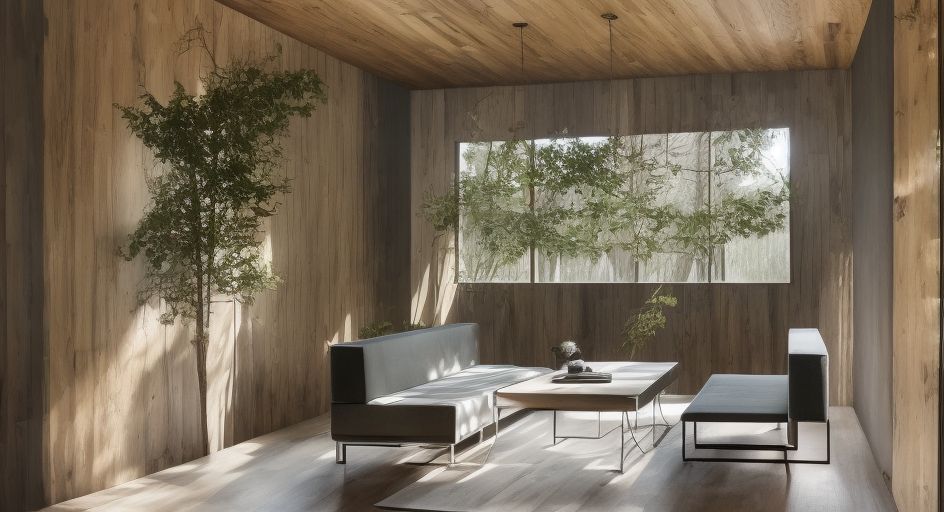
In this article, I have taken Automatic1111 as a reference and the possibility of integrating into this project an important feature introduced by the ControlNET neural network of which I posted a very brief sneak peek a few weeks ago. In practice, as explained by the two Stanford University researchers Lvmin Zhang and Maneesh Agrawala, ControlNet enables conditional inputs like edge maps, segmentation maps, and key points to enrich the methods to control large diffusion models and further facilitate related applications (here the paper arxiv.org/pdf/2302.05543). Thus this technology effectively confers an intriguing feature particularly dear to the AEC industry (but obviously not only), namely that of obtaining a sort of rendering of its architectural models in real-time simply by passing an image and a descriptive text as input to the neural model (text-to prompt).
AI as Rendering Engine is now something much more concrete and feasible
The principle is the one already widely discussed in some of my articles but also in many posts distributed on the net, i.e. the one attributable to text-to-image (T2I) and image-to-image (I2I) AI generative tasks. Anyway, CN as an expansion module of the Stable Diffusion webUI project by A11 could be installed as explained by the author here. The A11 project has been integrated with the FastAPI platform, not to be too technical this means simply that it is possible to use the A11 project with the expansion of CN directly by querying the local server, which is specifically located via localhost on port 7860. With these assumptions, I created the very first two components, AIeNG_loc and LaunchSD_loc, capable of putting together what has been described up to now, all through Grasshopper, this time completely avoiding the installation of multiple python libraries and simply using the Ambrosinus-Toolkit downloadable from Food4Rhino or from the Rhino Package Manager.
PART 1
Requirements: Machine side
In order to run AIeNG_loc and LaunchSD_loc components the designer needs to install previously the A11 and CN project on his machine. There are a lot of guides about how to, anyway the simple procedure is this below:
1 – Install Git modules for Windows OS from here;
2 – Create an empty folder wherein you want to install Stable Diffusion from the A11 project, in my case, it was this: D:\Desktop\SDlocal\ I suggest to choose a folder located in your HDD that not requires any Administrative privilege.
3 – From the above folder type this shortcut “WIN + F + S + A” to launch Windows Powershell as Administrator (it is the same if you run CMD.exe as Admin) and type this command to clone the Automatic1111 repository directly in that folder (in my case it is) D:\Desktop\SDlocal\stable-diffusion-webui>git clone https://github.com/AUTOMATIC1111/stable-diffusion-webui.git
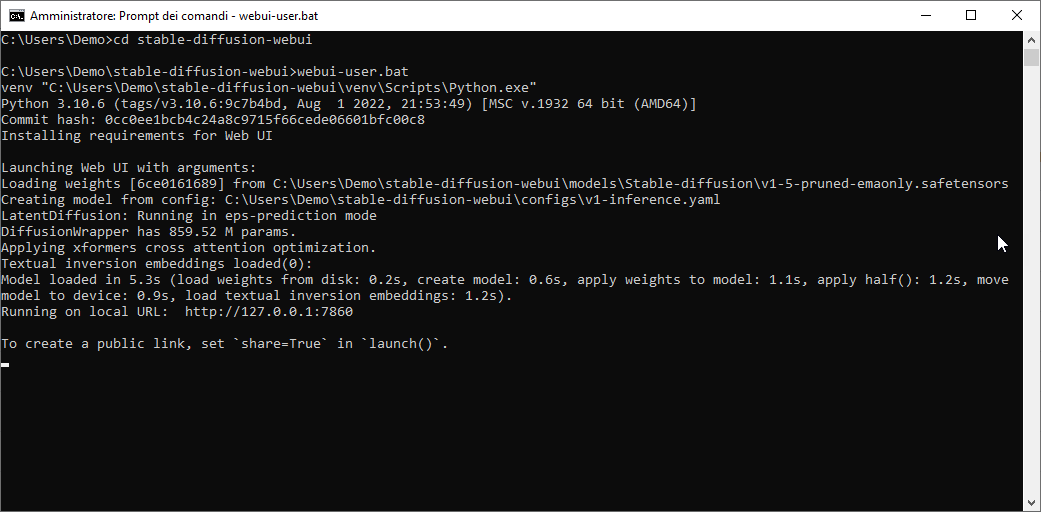
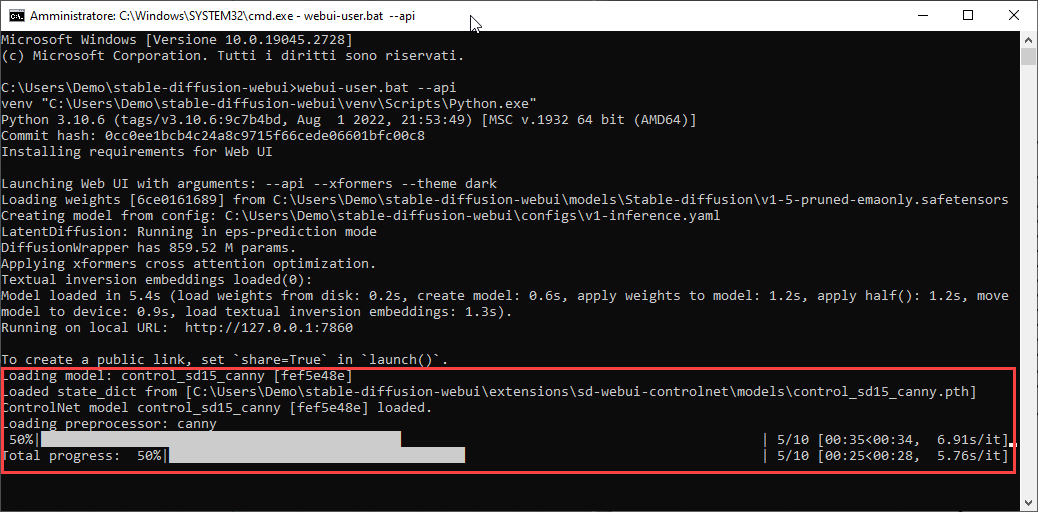
4 – Run on Windows OS webui.bat (or webui-user.bat) file in CMD.exe as Administrator credentials. The process could take a while if it is the first run. if all the process was successful you should see on the screen something similar to the image below (if the commit hash value is “None” something went wrong):
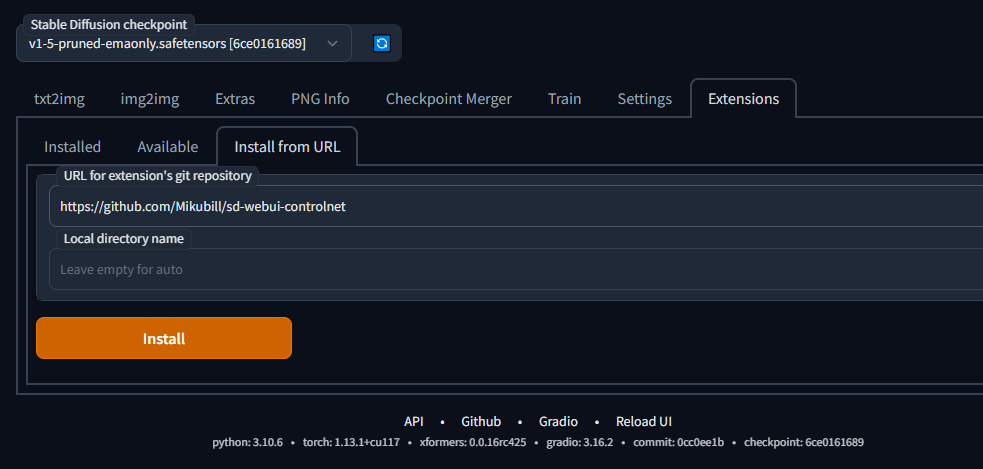
5 – Go to the local URL: http://127.0.0.1:7860 and from the Extensions tab and then install from URL copy&paste this address: https://github.com/Mikubill/sd-webui-controlnet . Finally, Install and restart UI (you can restart also from the Installed tab).
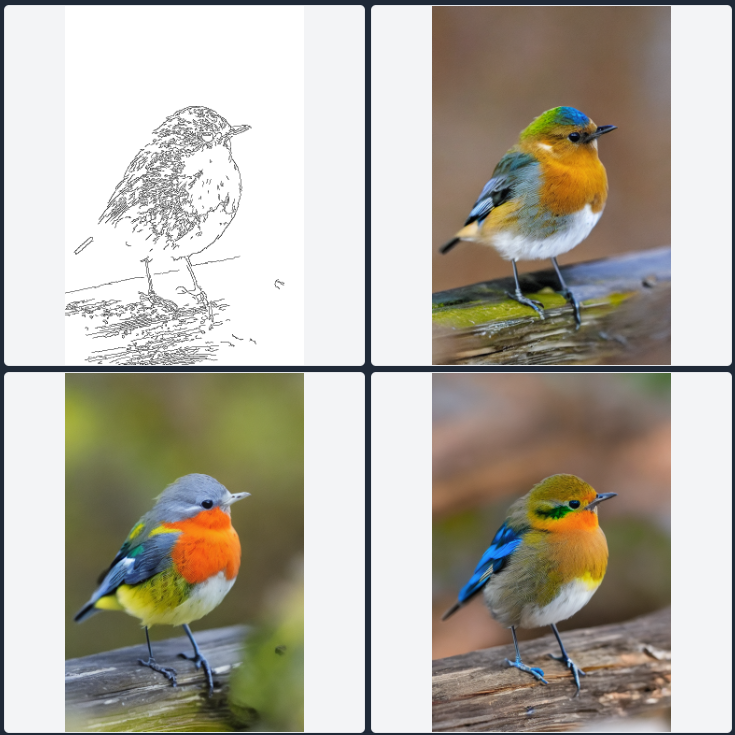
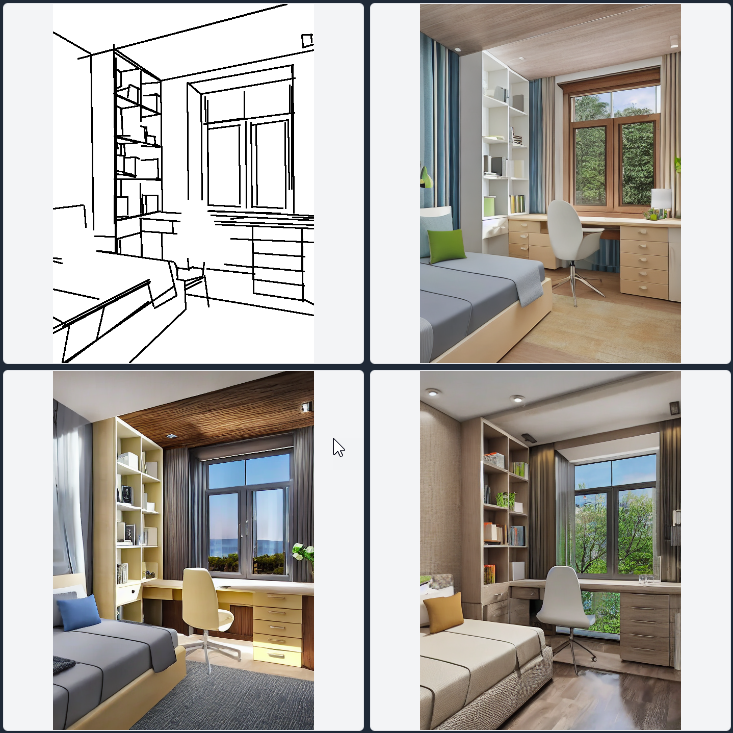
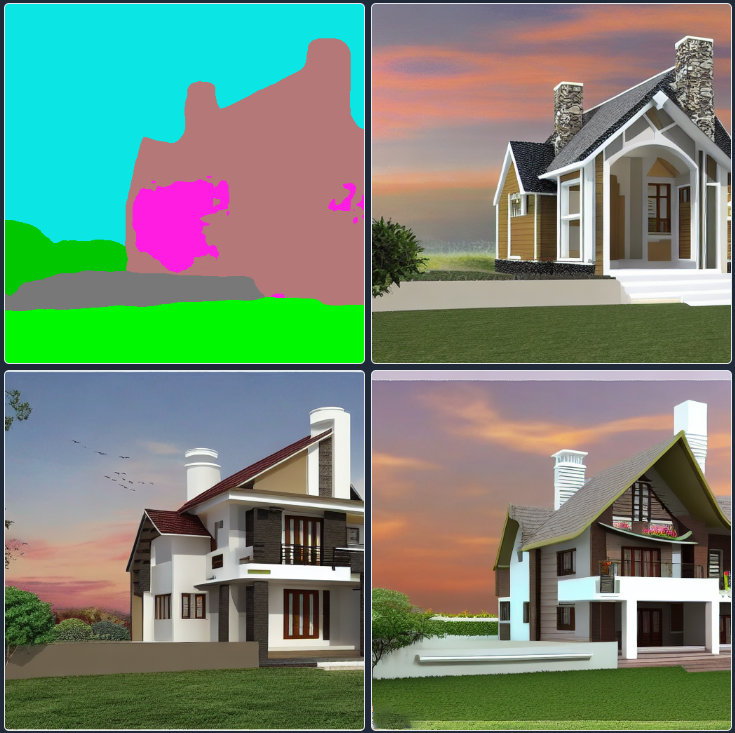
6 – Install one (or all) of these pre-trained datasets directly at the following path: \\stable-diffusion-webui\extensions\sd-webui-controlnet\models in order to run specific inference tasks. Remember that the models need to be loaded before running the LaunchSD_loc component. Basically, the type of image input is depicted by the first one at the top-left in the 2×2 grid below.
Source of the samples below and datasets from this author – please right-click on the links below and then “Save as..”).
7 – I have preferred to add an extra tip in order to run the Grasshopper components. Modify the “webui-user.bat” file with a simple text editor and replace everything with these strings:
@echo off

set PYTHON=
set GIT=
set VENV_DIR=
set COMMANDLINE_ARGS=--api --lowvram --theme dark
git pull
call webui.bat
The strings set COMMANDLINE_ARGS= call the Stable Diffusion API, set up a low use of VRAM resources (this depends on your VRAM availability, below 6 GB I suggest using it) and finally load the web UI dark theme (this is not necessary). The command “git pull” ensure to each run a quick latest version check.
| DATASET | EXAMPLE |
| CANNY: useful for using AI as rendering engine control_sd15_canny.pth (5.71 GB) Here is one of my tests: https://youtu.be/-LGCvGVfWnA Input –> image |
 |
| DEPTH: useful for using AI as rendering engine control_sd15_depth.pth (5.71 GB) with ControlNET the neural model has better control over the image-masking process. The monocular depth map here, can’t be selected as in the “DPTto3D component” already deployed through the Ambrosinus-Toolkit Input –> image |
 |
| HED: useful for image variations control_sd15_hed.pth (5.71 GB) Input –> image |
 |
| MLSD: useful for enhancing conceptual sketches control_sd15_mlsd.pth (5.71 GB) Input –> image/sketch |
 |
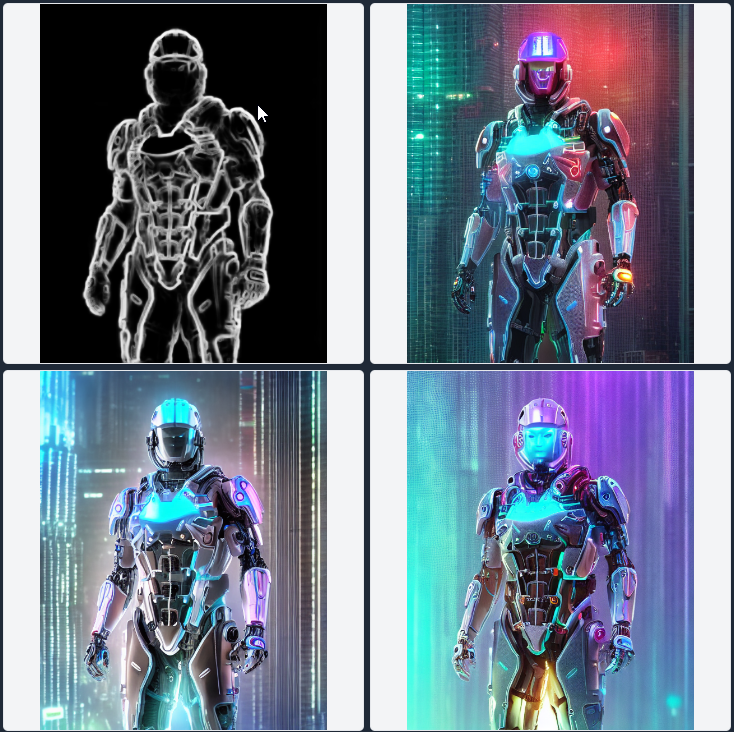
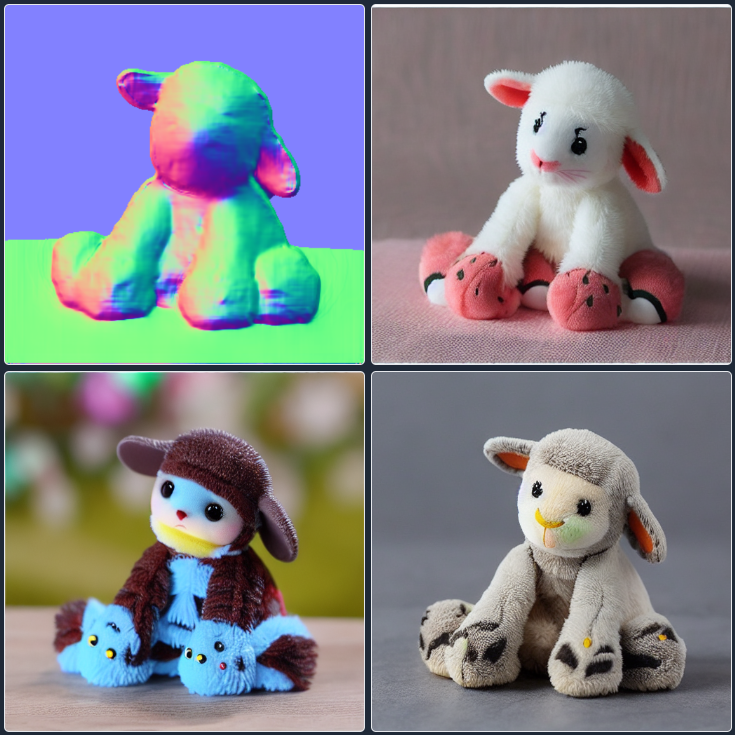
| NORMAL: better control over image variations (preserves more details than depth model) control_sd15_normal.pth (5.71 GB) Input –> image |
 |
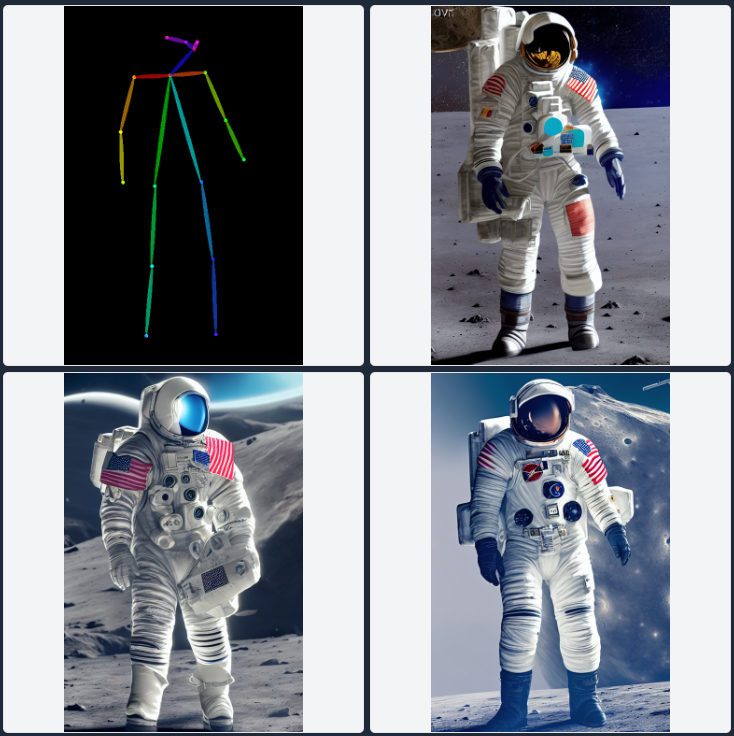
| OPENPOSE: preserve the image model pose in the image variations task control_sd15_openpose.pth (5.71 GB) Input –> image |
 |
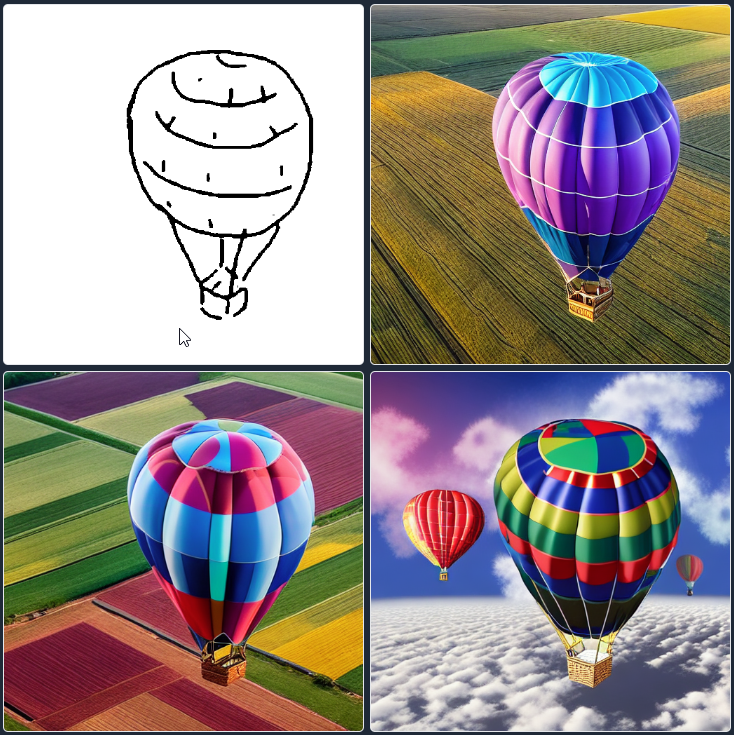
| SCRIBBLE: useful for enhancing your sketch control_sd15_scribble.pth (5.71 GB) Below is one of my tests with a handmade sketch inspired by Leonardo Da VinciInput –> image/sketch |
 |
| SEG: soon more useful description control_sd15_seg.pth (5.71 GB) Input –> image |
 |
PART 2
⚠️ Important Run Rhino as Administrator! Each session needs to run firstly the LAunchSD_loc component to establish a live connection between the Stable Diffusion engine and the Grasshopper components. Moreover, if you run for the first time a specific “Mode” model it is more likely that extra data (neural checkpoints) will be downloaded to your local folder (where the A11 project has been installed).
Requirements: Grasshopper side
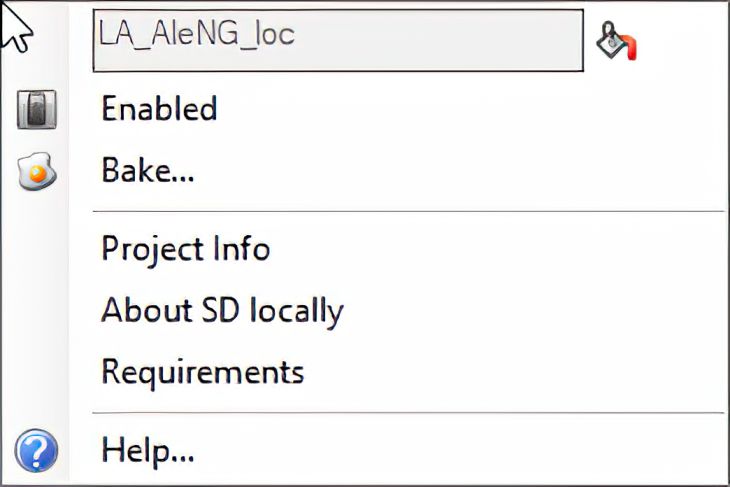
| LaunchSD_loc component | AIeNG_loc component | components right-click context menu |
 |
 |
 |
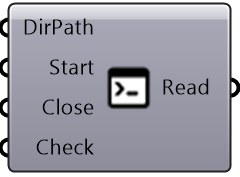
Parameters of the LaunchSD_loc component
- DirPath: the folder where Stable Diffusion (A11 project) has been installed;
- Start: runs the CMD process as administrator;
- Close: closes all the CMD processes;
- Check: checks the availability of the 7860 port at the localhost;
After running this component the designer can see a Windows OS frame like this below:

The green line represents the basic command launched in order to connect the new Grasshopper components (all ones with _loc suffix) to the Stable Diffusion engine from the A11 project. The blue line represents some extra arguments (previously added in the webui-user.bat), for now, these ones will not be launched from the LaunchSD_loc component because, for instance, xformers libraries are effective only for those who have the following NVIDIA-branded GPUs: Pascal, Turing, Ampere, Lovelace or Hopper card with Python 3.10. Moreover, some machines require also the NVIDIA CUDA toolkit installed. This part is a bit tricky, so for now I focused only on the very basic steps as described above. Finally, theme dark is the option to visualize the dark theme of the SD webUI. The red line represents the local URL, namely the address where the components will point at.
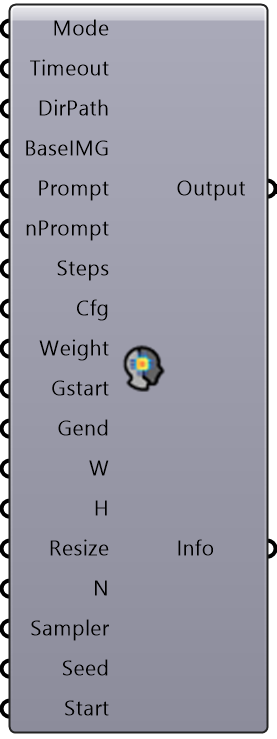
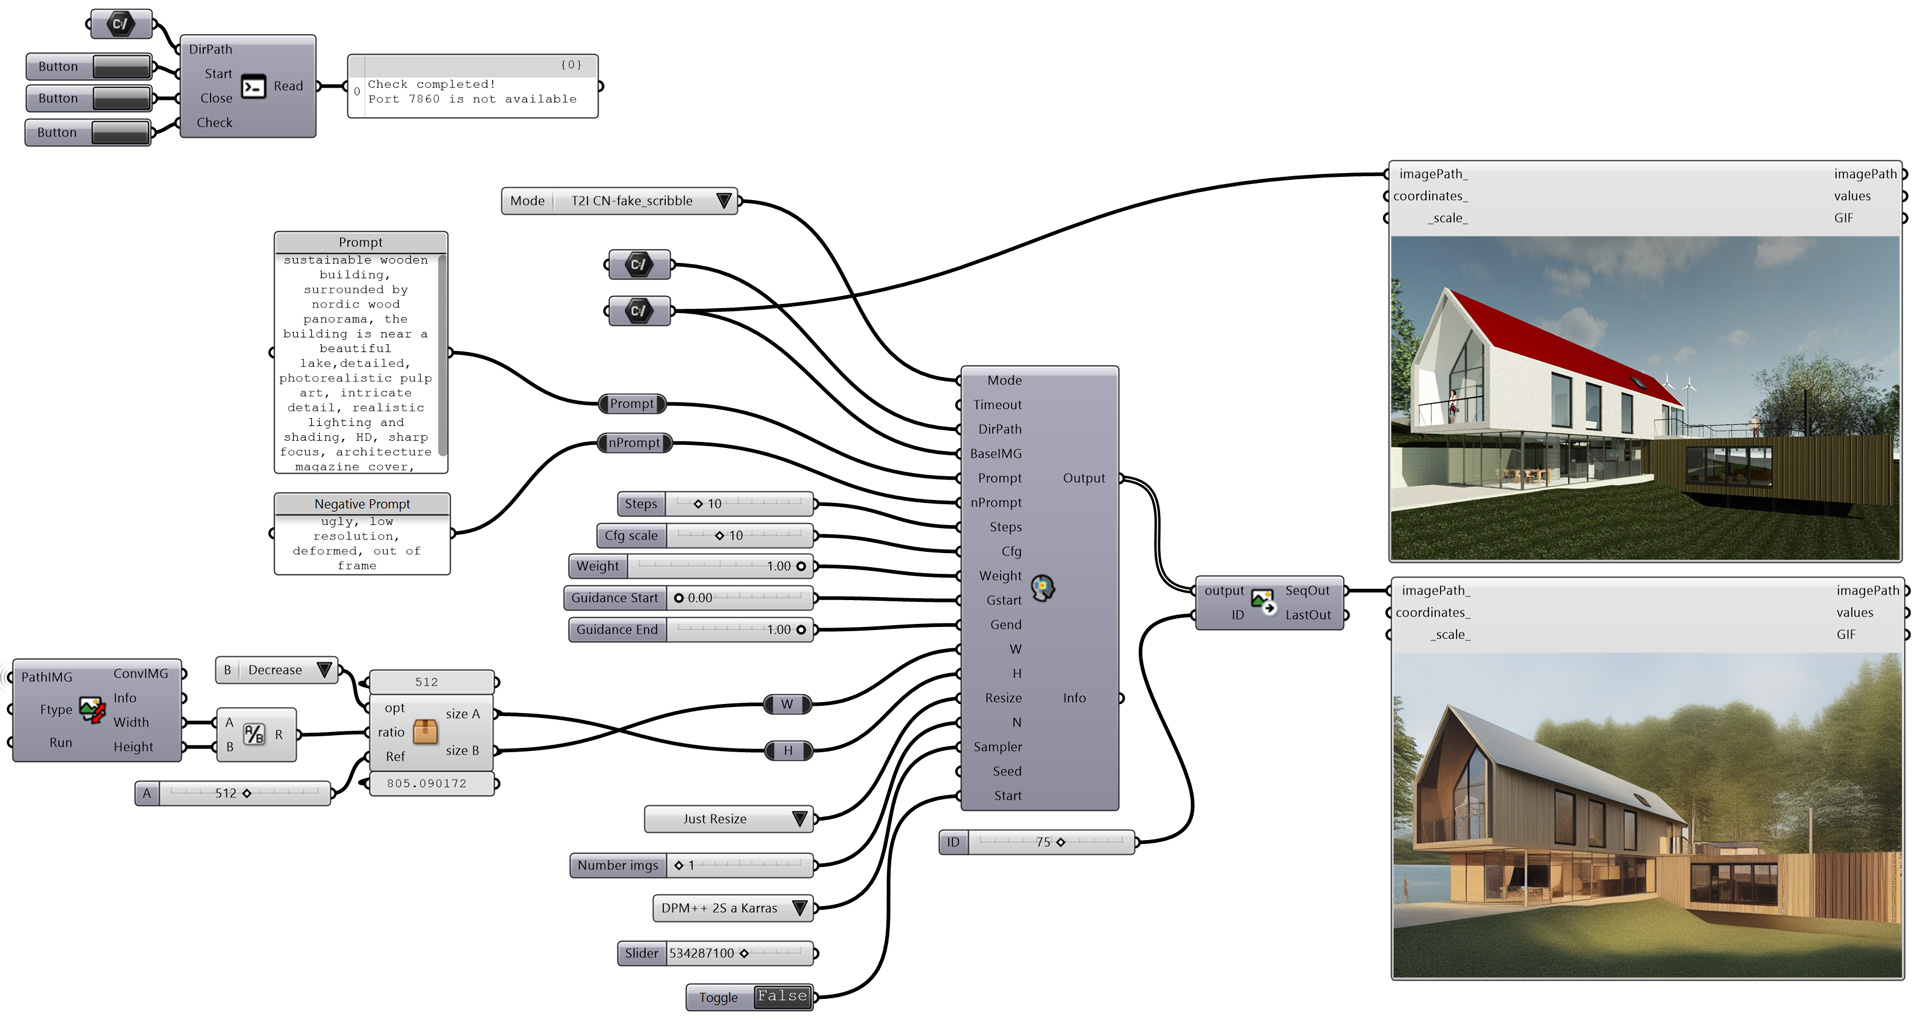
Parameters of the AIeNG_loc component
- Mode: Select the inference mode to run (the pre-trained dataset downloadable from the grid abovementioned);
- Timeout: If you want increase the WebRequest timeout (default= 10 =>10mins) add an int custom value as mins;
- DirPath: Assign the path of the folder wherein save all the images generated;
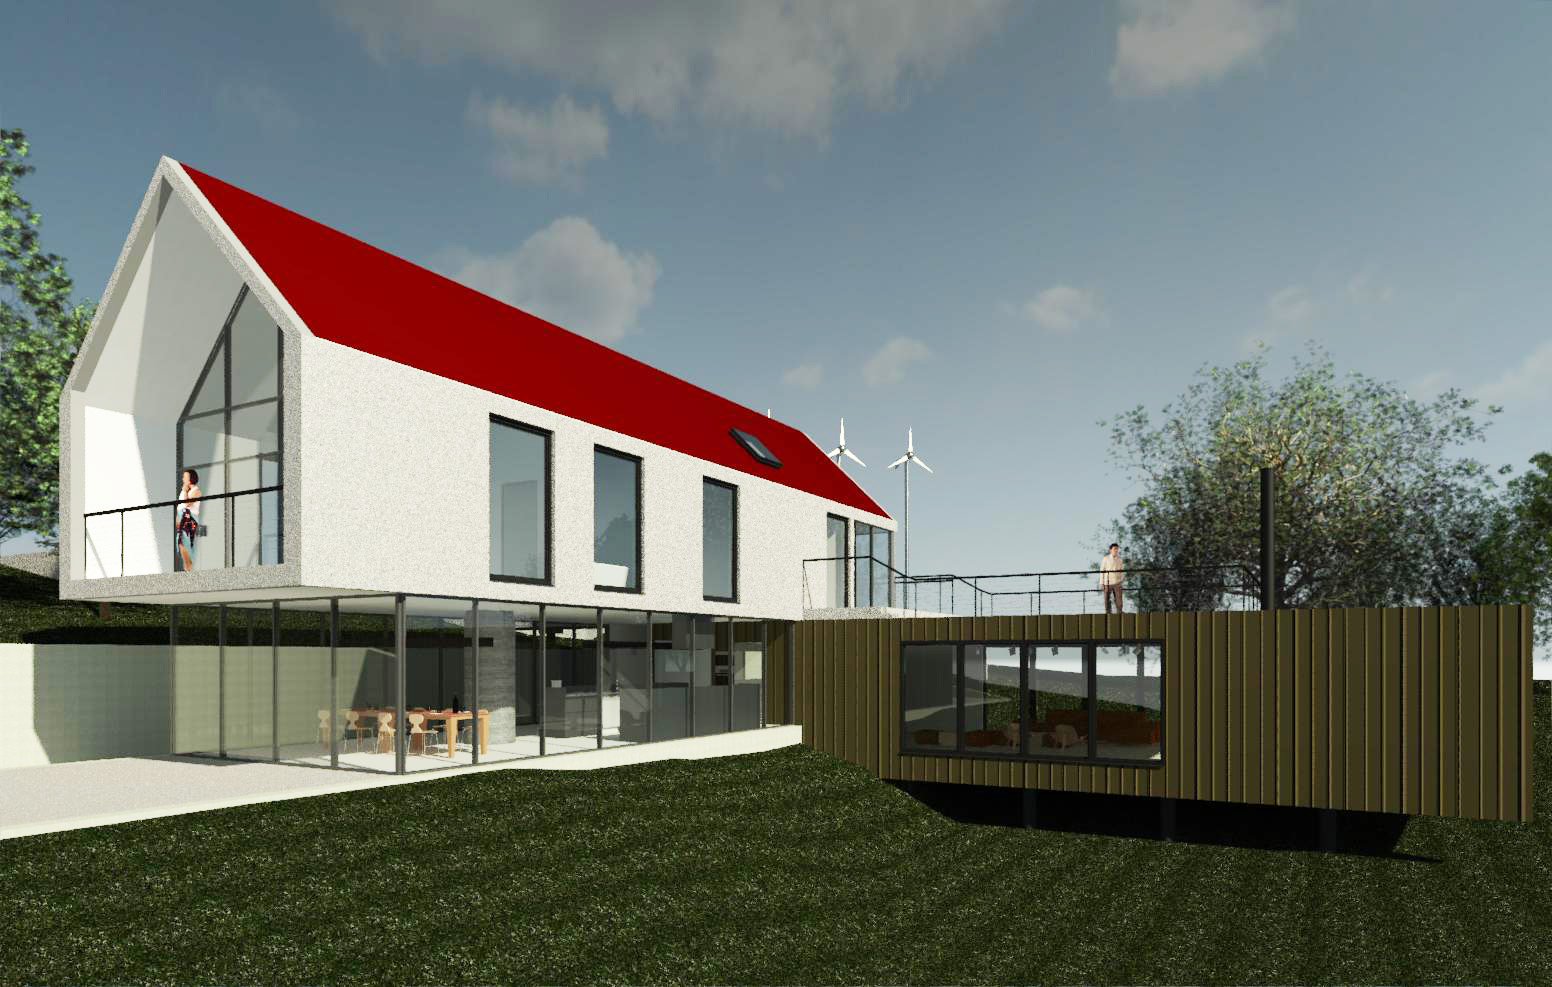
- BaseIMG: Source image path for all the img2img processes (ControlNET ones included);
- Prompt: Input Text prompt;
- nPrompt: Text prompt as negative input (whatever to avoid as output result);
- Steps: Number of steps for removing noise in the ‘diffusion’ process
- Cfg: Cfg scale parameter that controls how much the image generation process follows the text prompt;
- Gstart: Parameter that controls how much the image generation process follows the source image;
- Gend: Parameter that controls how much the image generation process follows at the end of the prompt;
- W: Final image width;
- H: Final image height;
- Resize: Type of resizing modes;
- N: Number of images to generate;
- Sampler: Type of inference sampler model;
- Seed: Seed value to discretize the process settings;
- Start: Run this component;
Example: The canny feature runs inside Grasshopper here below:
while the AI is processing, progress can be tracked through the Windows OS Command Prompt window (CMD). Before the progress bar, some strings relating to the previously requested process to be processed will be displayed. Sometimes due to hardware lacking requirements you could read some error strings about failed attempts.
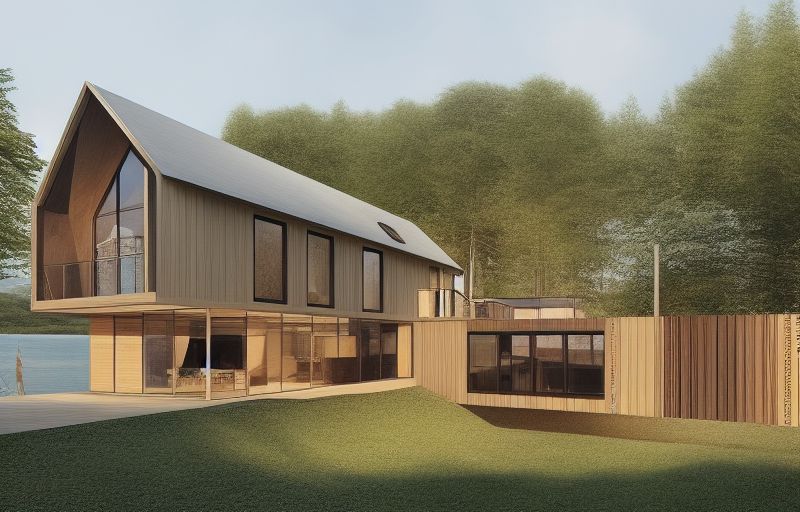
Example: text-to-image generated via ControlNET in “canny” mode
Example: “mlsd” test starting from a text-to-image generated via ControlNET in “canny” mode
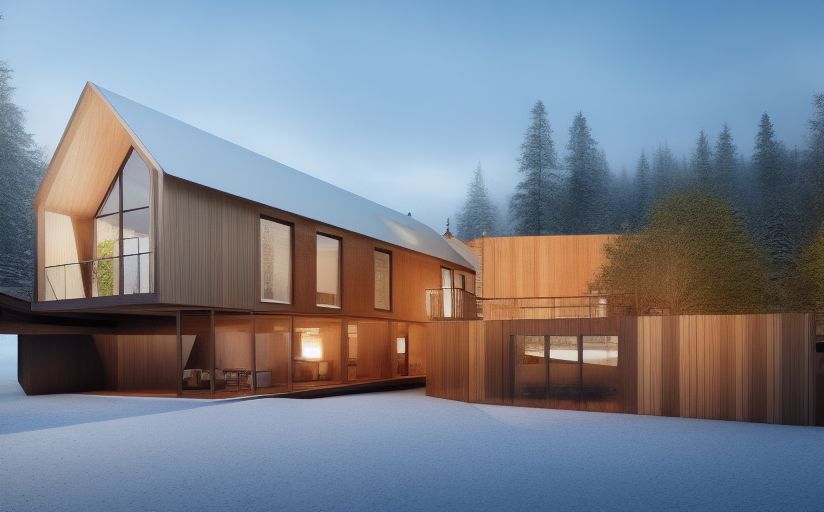
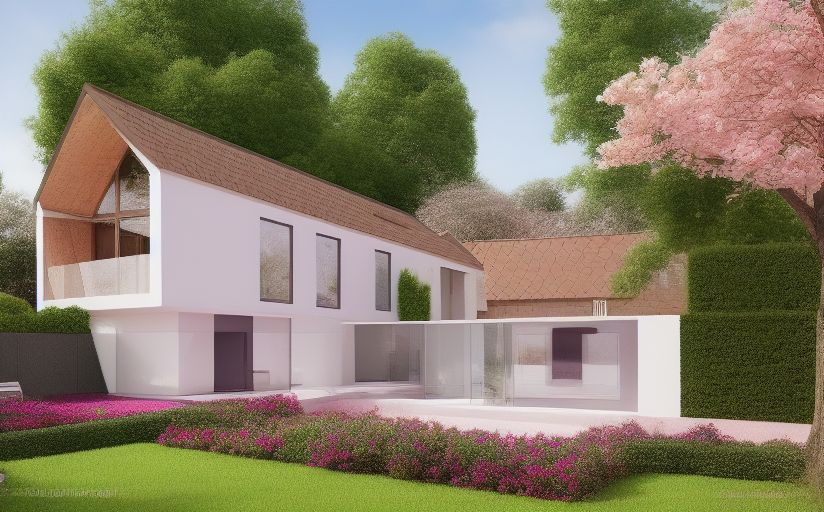
Example: text-to-image generated via ControlNET in “depth” mode

The version deployed with Ambrosinus-Toolkit v1.1.9 uses the Stable Diffusion 1.5, the future versions will be implemented with new features and the chance to integrate the v2.X engine.
What does it is possible to get from this component?
The current version can run text-to-image, but the most valuable feature is the ControlNET “power” because this neural network can be used as a rendering engine or simply as a superpower tool which enhances your design and pushes your conceptual sketches to the next level. Simple samples have been shown in the previous grid and in the video attached at the end of this article.
Why integrate into the toolkit the possibility to run SD locally?
As for all the other AI components, this step is part of a research project sealed in some academic papers (soon updates), in any case, this new Digital Era is still in a transition phase which is strongly tending to classify AI as a paradigm shift,
I personally believe that we are still in an “exploratory” phase of the “possible chances”.
Many tools, including some of the components I’ve distributed, start out as experiments. So the idea of sharing these tools for free (in agreement with a CoDe that is not completely open for research reasons) seemed to me the best way to meet the change … innovation and then, also because professionals are particularly burdened by the costs of licenses of any kind, for these reasons, applause certainly goes to the projects mentioned here and to the researchers who make possible an increasingly open and interoperable vision of the world of architecture and design.
This latest development has in my personal opinion 3 advantages
The first, immediate, is the possibility of experimenting through the web UI platform with all the power of AI for free, no API keys required, no fees to pay and what’s more, a render engine that promises very well; second, the possibility of integrating what has just been mentioned within our workflows in Grasshopper thanks to Ambrosinus-Toolkit; thirdly, finally, cultivate the community of architects, computational designers, creatives, creators to interact and do and be a network through the development of tools and workflows. Because each of us has a different way of understanding design.
The real superpower of AI in the AEC world is the ability to give life to “metatools”, as infrastructures for possible and unexpected solution tools – this will be the real paradigm shift.
These last few times have been incredible and the speed of production of new solutions and research, AI-based tools have proceeded at a very high speed. With the diffusion of projects that can be installed locally, I believe I have laid the foundations for future developments, integration of small utilities, etc… regarding the Ambrosinus-Toolkit “AI” subcategory1Especially AI project based on Stable Diffusion projects. However, mainly I will try to filter the tools and advances, giving more leeway to what can be considered effectively valid and useful for workflows in the AEC environment and obviously usable in Grasshopper.
Finally, the video below can be enjoyed all in one breath or based on your needs and curiosities. It consists of two parts, the first explains how to install everything you need on your machine and in the second you will see the first two components in action. I suggest you enjoy the video on YouTube so you can jump to the highlights of your interest noted in the description.
If you have come this far, you have received my sincere thanks! 😉
Video demo
UPDATE 1
Ambrosinus-Toolkit v.1.2.0 has implemented AI-Gen components based on the AUTOMATIC1111 project, with two new features: SDopts_loc and SD-Imginfo.
| SDopts_loc component | SD-Imginfo component | NEW components right-click context menu |
 |
 |
 |
SDopts_loc allows the user to set a custom Stable Diffusion model checkpoint. For instance, in the sneak peek video below I have used the “mdjrny-v4.safetensors” model, a dataset trained with Midjourney version 4 images. Currently (but above all in the very near future) the best output and AI-Gen exploration will depend on the typology and quality of the rained dataset used as a model checkpoint. Throughout the HuggingFace platform, lots of researchers have been sharing very interesting models and more focus on the architecture and building will come soon.
SD-Imginfo allows the user to read all AI-Gen settings used for image generation. In the future, I will implement it with some reinstate options like the very similar component already deployed for the StabilityAI engine.
Sneak Peek #1
UPDATE 2
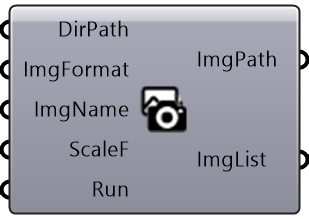
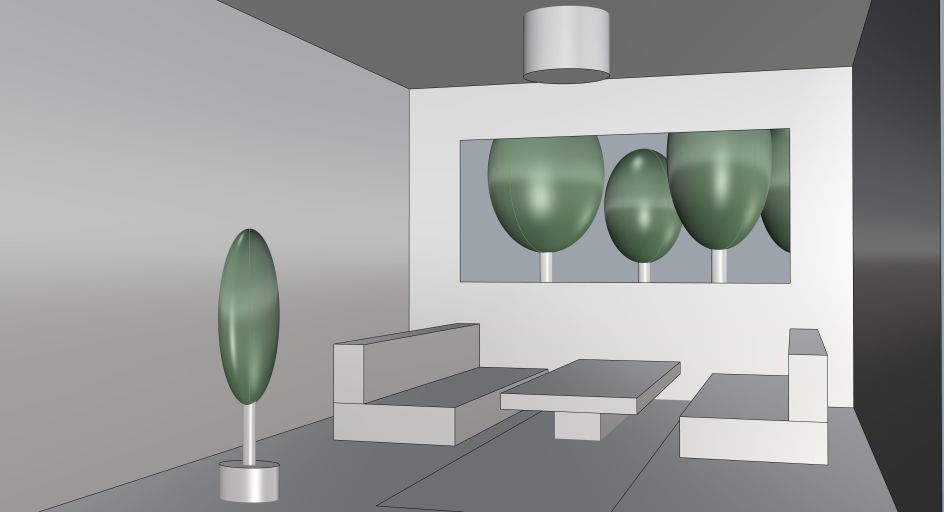
Ambrosinus-Toolkit v.1.2.1 has been implemented with the “ViewCapture” component (2.Image | Ambrosinus Image sub-category) so you can easily save Rhino viewport (I mean the 3D model shown in the active view) as file image format (JPG/PNG) and “Named Views” Rhino side panel. By this component is possible to pass as input the viewport image generated as BaseIMG for your AI image generative process using ControlNET models.
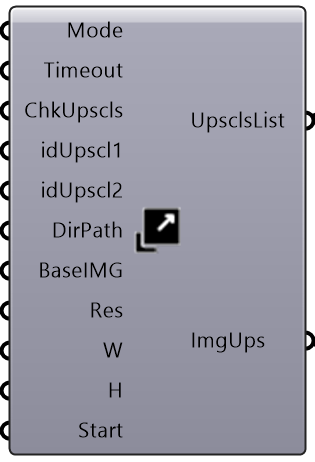
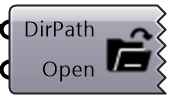
| New LauncSD_loc component | ViewCapture component | UpsclAI_loc component | OpenDir component |
 |
 |
 |
 |
The main update regards the possibility to interact with the webui-user.bat file like the WinSDlauncher Windows OS tool, so if you encounter some issue shown in the CMD terminal you can set new arguments according to A1111 feedback. Through the ViewCapture component now is very simple and easy to set a Rhino viewport as input in the BaseIMG parameter. When you save an image from the viewport automatically the component save the same view as the Rhino Named Views object.
My example is very simple (the 3D model is not so sophisticated even the prompt) but the result is promising:
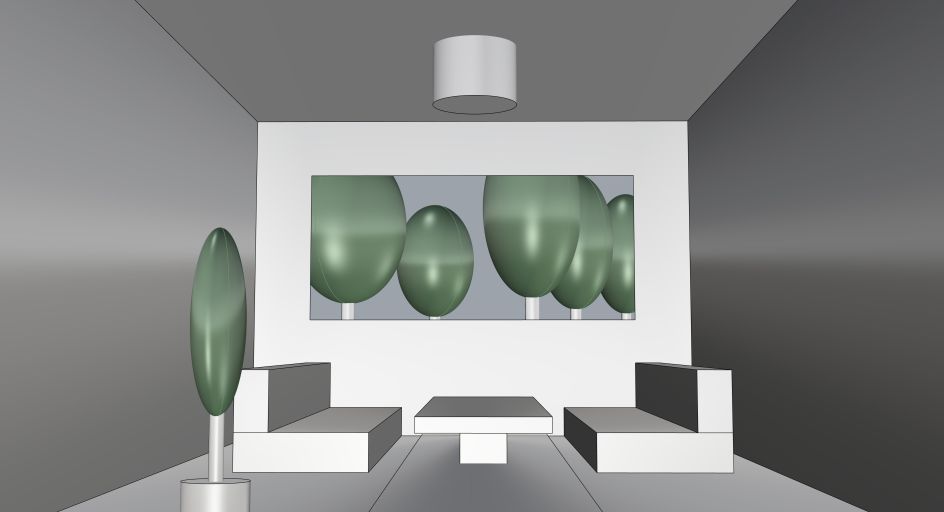
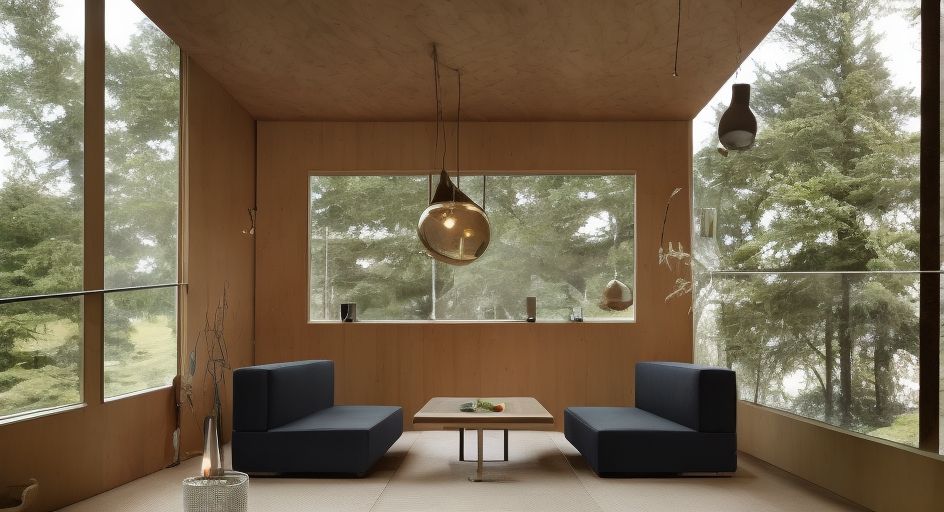
This Toolkit version as the previous one works with ControlNET v1.0 extension (but it is CN v1.1 ready too), this is very important to know due to the fact that ControlNET v1.1 is not yet API fully supported. See this video tutorial about how to install CN v1.0 in Stable Diffusion (AUTOMATIC1111 project).
Finally, thanks to the UpsclAI_loc component the user cal upscale the image using the upscaler model desired. In the video below I used the Ultrasharp_4x model and the final result is very refined. OpenDir component is partially a wip component but I found it helpful to open each selected folder quickly.
Video
Update Ambrosinus Toolkit to v1.2.4 and download the demo file from the link below![]()
